9.15.2010

Quick Harvest How To


Once again I have been inspired from a post by Amanda at The Hand Me Down House
She made amazing harvest pumpkins. But since I am sorta lazy these days....ok ok I'm a lot lazy...geeze. I decided to put a different "easier" twist to mine.

HOW TO (sort of):
First I bought crafting wire from the Dollar Store...this isn't as sturdy as Amanda's but it was cheap and actually I already had it at the house. Second I made mine smaller. It's a mini version.
Amanda had used a vase to wrap around the top for her sizing and she also cut each individual piece...NOT ME lol...I just wrapped the wire around my hand a dozen or so times stopped looping it mid ways through the "straightaway" and wrapped it around that a couple times. Then I twisted the original end piece a few times to make the stem....my my this is a horrible confusing sounding tut...and with no pictures at that...I'm really lazy....and well that's it...hoping you can get the gist from both looking at Amanda's how to and looking at my end result photo.


CraftGossip


BWS tips button

9.14.2010

New Blogger on the Block!


Today is a special post day, because, I get to introduce you to an amazing NEW blogger...I mean really new as in Yesterday!

It's Aleisha over at Sew What? That's how I Roll. She's a great girl and a very very good friend of mine. She's very talented and can sew up a storm.
She made her appearance into blog land yesterday, as I stated before, with a little of my help (so bare with her she's even newer at this than me) and I couldn't be more honored that I was her inspiration to start blogging!
Here's her latest/first real post! It's a how to on how to make a rag quilt! She's awesome at making them and so happy she could share with us her secrets! Can't wait to see what else she comes up with...check her out over at Sew What? That's How I Roll


Enjoy & Happy Quilting!...I'll have one of these posted in the hope to be near future!


Rag quilts are the latest trend in quilting. The are quick, easy and fun to make! They are a great project for any quilter weather you are a beginner or have been doing quilts for years! If you can sew a straight line you can take this on! This quilt was my stepping stone into quilting and I love it! There is so much you can do to customize this for any room in your house.

These quilts are great for snuggling up in front of the tv, or over the bottom of your bed. My fiance and I both have one that we curl up in every night.

The rag quilt can be made of denim, flannel, or polar fleece. It has to be a fabric that will fray and unravel when washed. Anything with a loose weave is good, flannel is a very popular choice.

Once you have your fabric picked out you can make this quilt in as little as a weekend.


If you happen to buy to much fabric don't worry, use it to make a matching throw pillow or to do some applique on your quilt.


Your quilt does not have to have batting, if you are using denim for example you may decide not to use any at all because it will be warm enough without it. If you are making it out of denim and choose to use batting make sure it is lightweight as it will be difficult to sew through 2 layers of denim and your batting which may also be very hard on your machine. Another option instead of using the tradional batting is to use flannel. I find this is really nice when you are making the quilt out of flannel.


Cutting the pieces for your rag quilt
Choose a minimum of 3 colors for this quilt. The more color the better!

Decide on the size of squares you want to use. For your fabric which I am going to refer to as flannel because that is what I enjoy using you want your squares to be between 7"-12" in size. You will be using a 1/2" - 1" seam allowence so for each block so please keep that in mind while deciding on the size of the quilt you want. You will also want your batting (if you choose to use it) to be 2" smaller than your flannel square.


My personal choice of size is 8" for the front and back squares with a 6" batting, because that's how I roll.


Okay so you have cut your top, bottom, and batting squares. Take your bottom square and put it right side down, then take your batting and place it centered in your 8" square. You will then take the piece you want to use for your top square right side up and line them all up together as square as possible. You will then sew a line from one corner to the other and again making a X on your fabric.

You will do this for all of your squares.

Hint: Using a walking foot on your machine will help the fabric be more stable so that tucks and puckers don't occur.

Below I have done a pattern diagram of a quilt that I have made. I will use this to explain how to now piece it together. I find drawing how I want the blocks placed to be the easiest way to follow it.


Start by sewing all of your first row together. If you use the same color for the front and back of your squares this will be easier. That 1/2" to 1" seam you left you will be cut later so make sure the raw edges are all facing the same way.

You will then attach row 1 to row 2 and etc. again make sure your raw edge is still pointing all in the same direction.


After you have attached all the rows together sew 1/2" - 1" inside the outer border all around the quilt.


Using heavy-duty or spring loaded scissors, cut lines in the seam allowances about 1/4" apart. Try to cut as close to the seam as possible without cutting it. (If you cut the seam it will fall apart in that spot when you wash it)


The scissors above are what I bought for doing rag quilts. I got them at fabric land for about $12-$15. They are great! You need ones that will cut 2-3 layers of fabric with the last 1/2"-1".

Once you have cut all the seams then throw the quilt in the washer and run it through on a normal cycle. I use cold water becasue sometimes the colors will run so this will reduce that from happening. I do not wash these in my own washer because of the amount of lint that comes off them is rediculous! It could clog up your drain in no time and that is cause for a HUGE mess. Spend the $4 and take it to the laundrymat!


Once the cycle is finished give the quilt a good shake out and pop it in the dryer. Use pretty high heat because it will help the seams fray more and become soft and fluffy. Once again I would do this at the laundrymat.

Once the quilt is dry shake it out. Lots of lint and fluff will come off. Use a lint brush to remove any excess lint and loose threads. You may also want to trim up some of the frayed edges.
If you have some stubborn threads that you just can't get off try using the vaccum cleaner to suck it off.


The more this quilt is washed and dried the fluffier and more frayed the seams become.

If you have any questions that I may answer please let me know.

Here is a look at the finished product

9.12.2010

On a Bad Streek...


So today...I went to try another project from my wonderful can you guess what I'm up to now post...and well I think maybe, just maybe someone of greater power wants me to hold off things for a moment, not to mention said days Krylon disaster...because.....

This happened...what is it you ask?
a counter top...(I will never do a craft on my new cupboards again!)

Please note the black spots/marks


Keep going...what's this photo?


A glue stick..?

That leads to this,


which leads to THIS...yep that's a very burnt glue gun! use to be orange and black..now it's mostly just black...hehee


It burnt the glue stick, my cupboard and ALMOST a burnt me...it made this crazy mehhh noise like the buzzers on Jeopardy and then bounced off the counter and started smoking worse than (insert a chain smoker joke here)

Scared the begeebers outta me and well obviously it was now unusable. So I got me one of these bad boys!


actually it's a girl and her name is ROC-SIE(pronounced rock - see) - why Roc-sie? Because she ROCKS that's why..duh! I mean really though..is this not the most awesome glue gun you've ever seen? I'm going to get another one next week as a spare...just incase this wonderful should ever quit on me.

So since I just got her today, you will see my idea from the photo inspired post tomorrow!

On a lighter note! Guess who came home today? My hubba's best friend...here's a photo of the poster my daughter made for him!


9.10.2010

Fail that's not my Fault & some Ranting


So this is a fail...but in no way is it my fault...it's Krylons! Yes, I'm blaming someone else yet again for why things don't turn out...but this time it's for real! My hubba is even more thankful this time it's not his fault. So here's my issue...


Do you see this can of spray paint? ---->


Well, with that can of spray paint I wanted to make this lamp

Which would have been phase one of today's ideas
It also would have been my very first PBarn knock off!

The color on the base of this mercury lamp matches the top on the can of spray paint don't you think? I did to...but...the loverly people (jerks) at Krylon don't know how to label their cans and made me FAIL!

Here's how it all started...I found this real purdy lamp at my oh so favorite thrift store months ago for just $2.00 and I decided yesterday that I was going to glam it up by making it look like mercury glass then if that worked I would do it to my white one in my living room the same - buy a matching shade and wahhhla fancy pants lamps!


I started by spraying it black (to make the mercury effect more real when the black shows through instead of gold)...no time for primer it will just have to do...I'm way too excited about this!


Because it was not cleaned real well or primed the paint was having some problems sticking...HEY black mercury glass...but no - this is not what I wanted, and still not Krylon's fault at this point...see the picture below how it's bubbling? Might be a little dark to see..I'm to mad to photoshop photos today.


Next, after that dried, I used a water spray bottle and lightly sprayed the lamp with water to create the bubble effect, and then used the wonderful chrome like looking spray paint to go immediately on so the water wouldn't run or dry.
The "silver" metallic as they call it in Krylon Lier Land.
Here is where it is NOT my fault!


You see that...does that look ANYTHING like the lid...NO! It's a nice color and all but, no it does not! You big fat liars...not you..but KRYLON...

So here I am in the basement (because it's raining here) spraying my lil heart out all happy that I'm going to succeed and make my first Knock Off, and WHAM..suck.


I'm down there hollering at Krylon and Walmart for false advertising (even though it's not Walmart's fault either) Sounding like a mad women I'm sure...

But as you can see from below IF Krylon didn't mess up my project, it was turning out PERFECT. So YOU fail Krylon not me...YOU!


Let us recap again..and then I'm done complaining I swear...for today anyway.


Does this look like that?


and just because, I'm returning the can to Walmart today and looking for another kind of spray!
And since I'm in a mood...we'll see what the rest of the day brings for projects...might not be much : O |

9.09.2010

Can you Guess what I'm up to Now?


Here's what I'm thinking....


Tune in tomorrow to see what I've come up with!

9.07.2010

Back to School & a special message!


Since everyone seems to be doing a montage for back to school in blog land I thought I would be a copy cat and do it too...here's my gal on her first day back to school...the BIG GRADE 1...she was soo excited...give it a few years, I bet that will change....

Here she is just after breakfast striking a pose


after I took the photo she says "how bout doing one like this mom?" and strikes another pose

Here she is soooo pretty smiling outside waiting for the bus, I just love her to bits


She tied her own shoes today, where did the time go?


And there she goes....there goes my lil girl.....*sniff sniff* (wipes nose on shirt)


And lastly there's her daddy, going to work after watching his little girl go off to school on her first day...for the first time (he missed her very first day of school because he was away for work)


PLEASE READ THE FOLLOWING! EVEN IF YOU'VE READ NOTHING ELSE ON THIS BLOG TODAY!


I just wanted to you all to know that my husbands best friend is also missing his little girl go off to school for her first day because he is in Afghanistan. Being a soldier is a hard job, we as wives (husbands) and children are silent soldiers standing behind the men and women we love as they make a sacrifice for their country. (bawling now)
We Miss you, and can't wait for your safe return home! Stay safe Troops!
Please take the time to thank a soldier for their service...my husband once told me that the best complement he ever received was from an older man who stood beside him at a Remembrance Day Ceramoney and said "thank you, for your sacrifice for our country" he told me it made him so proud and every day since, when he puts on his uniform the thinks of that man and that he really IS making a difference in the world. It really does make their job easier to know so many people are thankful, sometimes just hearing is that little something to keep them going!

9.01.2010

Hide & Seek


What's this you ask?


So we went over to the in-laws this weekend just past. They have this old shed...where they just store (dump) everything they aren't using or want...kinda like my basement...anyways I've never gone in for fear of spiders or some other onlooking type of animal - but this weekend curiosity got the better of me. I must have spent a good 30 minutes in that building - it was like a treasure trove. (Hide and Seek) I told her that I was going to probably have it all emptied by the end of fall. That's stretching it a bit but there was some amazing hidden treasures in there, that I can't WAIT to get my hands on...if only we had a bigger car and didn't live so far...my basement might look a little more cluttered! And that makes my heart sing!

Here are some leftovers from some renos I did for her...old molding and some beadboard...yep I'm taking those back. I'm a taker backer...I think I'll back some shelves with the beadboard and trim it with the molding. There's also some plain boards as you can see in the photo..I think I'll take those too...maybe use it to actually MAKE the said shelf


Here's an old wooden love seat with not cushions...I'm gonna love this one! Maybe I should borrow my dad's hauling trailer? Yea that's what I'll do?


Here is a photo of an old table they had, the top got a little warped but I plan on taking those legs....yes mine are short but that's not what I'm thinking...I seen these cute lil coat hander racks that these babies are about to be used for.


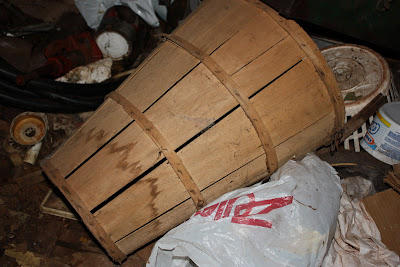
I love this old tall apple basket, it's a little water damaged and a bit mangled but with a little love...this will look beautiful. I had to set something light with a but of weight a top it because it was smushed so that "chip" outta the top rim isn't actually a chip it's just the weight I used.


Rope, rope and more rope! They use to be fishermen, and fisher women before the business went sour. They have TONS of this lying around and old traps. This rope is perfect for making those beloved Monkeys Fist.


I already made one that night to show you all...the color of this rope will look amazing in that bathroom redo you are all aching to see, well at least I hope you are (still waiting on the floor though)

There's tons of tuts on monkey fists on you tube just search how to make a monkey fist! Some videos are better than others..but you'll find one that's right for you.


Old windows...can't have enough of them, though I'm sure the mother in law would beg to differ. Her hubba has brought a few or more of these home...can't wait to use them!


Here's a photo of an old dresser drawer and more wood! There's a complete old broken down dresser that goes to this drawer...I have a vision for these drawers...yes that is what we will call my obsessive junk hunting...visions

And LA PIECE DE RESISTANCE, I am not sure I will be able to snag this little gem from her as it was her grandmothers, Hubba's great grandmothers. I want it SOOOO badly though. It was the only thing neatly tucked away without anything thrown around it...I almost missed it because I was just rummaging through the other things I didn't think to look in the one open space in the shed. - Isn't it the most beautiful piece you've ever seen?


WELL - She is going to KILL me for this...showing people her messy place...but we all have them, some more extreme than others - others less extreme than more...it's our inner hoarder. If you don't have one of these spaces, you are obviously not creative!
If you don't see a post from me in a while, it's because she's holding me captive...


ON ANOTHER NOTE

I went yardsaling that same weekend, it's no wonder we didn't have space for any of the shed finds...take a look at what I found!


Ok, so this is not a yard sale find, it's a kijiji find (aka. craig's list) I got it for 30.00 the quilt, two shams, and three cushions, it' has changed the room up a bit but still has the same color scheme, no more shower curtain at the end of the bed. This is actually not only cute but functional!


Next up we have Twilight Saga Hard Cover books. For $11.00 for the set! I priced these here are our Walmart after I finished watching the three movies for the first time only last month...yeahyea, I know I'm behind the rest of the world. ANYWAYS...they are 63.00 plus tax. YUCK so I am soooo very glad to have only paid $11.00

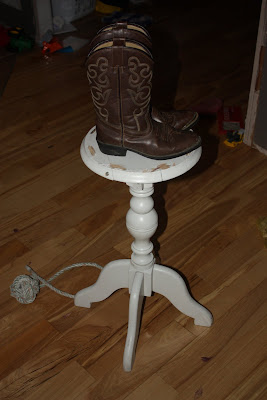
And the below photo I bought these cute lil cowgirl boots for my daughter for only $1.00 and a pair of brown cargo GAP shorts for my son for $1.00. The table/stand, how much you say? uhhhh .50 cents..yeah that's right .50 cents. It was obviously one of those old plant stands but they cut the top off only to not know what to do with it and think it was worthless. As I was giving her the money my friends mother asked what I was going to do with it...I told her I was going to build a new top for it and glue it on...the lady that sold it said "I never thought to do that" geesh..some people have no imaginations!

I also got a cute vanity stand and two wicker baskets (yes the basket obsession continues) for only 2.50 for the lot. Can't wait to show you the stand also featured in the new bathroom reno!
I got two large planter pots and a new mop bucket for .75 cents and a few pieces of jewellery for 1.00 each and some more books...I didn't take photos of them all but I figured I have enough photos in this post as it is.